|
Magmadar is killed before going for any other bosses in the zone (save Lucifron) because when he dies the roamer ancient core hounds stop respawning.
Getting to Magmadar:
Getting to magmadar picks up where getting to lucifron leaves off. The only thing remaining to clear after lucifron is the rest of the core hound spawns though. The main thing we make a note of is that the core hounds are on a 1 hour respawn timer, so we plan accordingly should we fail a run or two or three.
Group Setup.
Groups are shuffled around from our standard setup for Magmadar as follows:
-If possible, two dwarf priests are put into the tank group (for fear ward)
-Healer/healer/dps/dps/dps groups are organized such that melee are focused in certain groups and ranged damage dealers in others. Ranged groups tend to be ok with one healer. Melee groups should have two.
Magmadar Abilities
Some of these may not be exactly correct, but they should be close:
•Magmadar has a frontal cone shaped ae much like onyxia. It doesn't do as much damage as onyxias, but it should still only be hitting the tank.
•Fire Spit: Magmadar spits out "globs" of fire at random people throughout the fight. The glob of fire stays at that spot on the ground for some time. Everyone runs out of the fire if it's spit at them, and then avoids it as much as possible afterwards. If you touch the fire you will get a nasty dot on you.
•Magma Spit: I think this is a pbae dot. It's super weak damage though - mainly just annoying because it stops us from bandaging.
•AE Fear: Magmadar has a 30 second cooldown AE fear. Once his cooldown is up, he has to "decide" to use it so really it's done every 30-36 seconds.
•Frenzy: This is the important ability that needs to be countered. Magmadar will often go "into a killing frenzy" (there is an emote for it that everyone can see). He then does much more melee DPS to the tank. Hunters can "cancel out" the frenzy with the spell: tranquilizing shot (which drops from Lucifron.)
The pull
The tank stands in the middle of the lair and healers get max heal range from him. Then another warrior pulls magmadar to him so he doesn't have to move. This isn't totally neccessary - but it helps. The tank shield walls at the beginning (this is true for almost all bosses)
Strategy
One of the dwarf priests in the warriors group has the sole job of keeping fear ward on the warrior. Each time a fear goes off, they cast a new one. The other dwarf priests role is to keep fear ward on themselves - and heal the tank right after/during a fear when there will be less heals going around (because people are feared).
Frenzy is what kills tanks. The job of the hunters is to keep frenzy off of magmadar as much as possible. The hunters take turns, in a specific order, to ensure they arent wasting tranq shots. They hit their macro to inform the other hunters and the raid when they take the shot. If the shot "misses" (magmadar doesnt shrink back down to normal size) the next hunter goes. If the shot "hit" it's the next hunters turn next time magmadar frenzys.
The most dangerous situation is when an AE fear accompanies a frenzy and also accompanies a missed hunter tranq shot. This may sound rare, but it will happen multiple times a fight. To protect against this, the healers in the ranged damage dealers groups try to OOR the fear and then run in and heal the tank right after every fear. The other counter to this is simply other tanks. If we lose a tank it isnt a big deal. As long as our other warriors have been fighting the mob aggressively, magmadar will turn on them when our tank goes down. They should hit shieldwall and expect fear wards and heals to be coming in shortly thereafter.
For positioning, all ranged damage dealers stand back with the healers on the "front side". All melee groups run around and fight on the side. There are several reasons we split the raid in half like that. For example if the healers are on the same side of the mob as the tank, they can outrange the AE fear if they stand at max healing range. Melee on the other hand don't want to get hit by the breath, so they need to fight on the backside. This also spreads our raid out in a much larger area so that (on average) the spits will hit less people and do less damage.
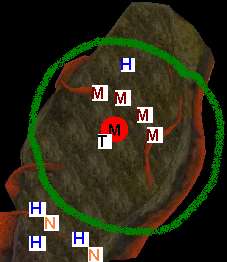 |
T = Tank
M = Melee
H = Healers
N = Nukers.
Grn.
Circle = Fear Range |
As for healing, people just do their best to keep their groups up, plus toss the tank extra heals as they can. Since groups take damage sporatically theres always healing to go around for the tank. We try to keep some dispellers out of range of the fear. As soon as the fear goes off they can run in, dispell another healer on the way in, and then make sure the tank is being kept up.
Overall Magmadar is pretty easy, but a wipeout is always a possibility. Just depends how unlucky we get with the frenzy-gibs and how fast we get him tanked when it happens.
|